Tuesday, May 19, 2015

A Song of Fire and Fire

"Are you offering to teach me something?"
"Teach? No. Ain't got the patience for teaching. But I might let you learn."
- Maskerade by Terry Pratchett
Jon Snow was wrong about winter this year and frankly I barely noticed spring either. This I suspect had more to do with our interminable and suspiciously good weather and less to do with time flying by. Indeed time ground by like a millstone being worked by a team of kittens - slow, but ultimately better then a sweaty donkey. Working with the guys at Orion has been really great. I've learned a lot just by being around them, but I understand now why they said they were offering an internship, not an apprenticeship. They're too busy to teach, but they've been kind enough to let me learn around them. Not that I'm complaining, in fact I prefer to flail about in the deep end most especially when there are no life guards on duty, but it sure can be a devil on the ol' biceps.

I also had a chance to help out on a job with Joe over at Dry Canyon Forge, and he loaned me a few books to learn from. And of course I've learned a lot from the internet and the library books, and the COMAG (Central Oregon Metal Arts Guild) meetings every month. I want to say that being autodidactic isn't as wonderful as it sounds, but that sounds like a thinly veiled humblebrag way of saying that I'm inventing blacksmithing which - to your great surprise I'm sure - I am not. More like polydidact (not to be confused with a polydactyl, which would be way cooler, but probably not nearly as cool as being an autodactyl, which, in my mind, is a category that includes Wolverine and Inspector Gadget) - trying to learn from everyone and everything except myself because I certainly have very little helpful advice to offer myself. 

Anyways, the good news is that at this point nothing is particularly holding me back in my shop! I've got the forge tuned pretty well (it's at least not oxidizing too terribly now), the anvil has a sexy stump to rest upon, the post vice is pretty well rooted, I've got the welder just about figured out so as to be useful, the floor is mostly level and satisfactorily covered in dirt but not made of it, and I've made a healthy array of tongs, bending forks, twisters, chisels, punches, drifts, slitters, etc. I don't mind saying that I've come a hell of a long way from where I started, and in fact it puts a smile on my face every time I see the place and how much it's filled out since the beginning. Plus look at all this stock material I've got lying about now!

Ok, it's not that impressive compared to some of the blacksmith's shops I've seen, but most blacksmiths have piles of metal that screw with airplane compasses and would make the most dedicated of hoarders blush and I will never be like that. Nope. Never.
Finishing the "build a forge" project and beginning the "make a living using your new forge" has been a challenging experience. This definitely didn't come as a surprise like, "Woah, what?! I thought starting a small business with no prior experience was supposed to be as easy as finding my belly button! Thanks Obama." It isn't as if I'm going into cobbling where as soon as your shop is set up the elves move in and start cranking out shoes (I'm pretty sure). Even still, I guess I had hoped I'd have more sooty, muscular shoulders to lean on by the time I reached this leg of the journey. Not that the COMAG crew et al aren't supremely helpful, but I feel like I can lean on them to the same degree that one might lean on one's proverbial neighbor for a hypothetical cup of sugar (but of course would never actually, I mean really metaphorical Safeway is just down the road). 

Being your own task master and teacher can be really frustrating sometimes. How do you gauge whether you're doing well for your skill level or if you're just not cut out for the job? How do you judge your technique and give tips to yourself? How do you give rousing motivational speeches to yourself when you're looking at the product of a whole day's labor and it's redefining ineptitude? Where do you draw the discipline to go back to work every day when you feel like you haven't been successful at anything for weeks? How can you tell if the pain you're in is normal or doctor-worthy? How do you discern when an expense is worth the investment and when you're trying to paper-mâché over your lack of experience with dollars?

Sometimes I think I wax a little too dramatical-like about the hardships of this admittedly self-inflicted project here, but then again the whole point of this blog is kind of a spillway for catharsis when Bucket is already working at capacity; yes, despite what I may have led you to believe with all my insightful and informative posts on such thrilling topics as charcoal and Papers I Have Made. 

Despite my struggle for objective clarity, I can tell just by looking at what I've made that I've made at least a little progress in the past few months. Hindsight is a better optometrist than the present for putting things in perspective.

Left - February sadness; Right - May gladness
I've gotten a lot better at planning, drawing, and measuring before acting, knowing what tools I'll need and how to use them, and knowing how to make the metal look like what I see in my head. I've also become a lot more realistic about my capabilities so early on in the game. I am not ready to forge very complicated things, and it has been really humbling to realize that the hard way. I've started to set much smaller goals for my days that end with products that might not be super exciting (e.g. Make Five Wall Hooks Today!) but that I can do successfully. When you don't have anyone around to give you feedback on your work, your work itself becomes a primary source of feedback. By tackling projects that are too difficult for me now, I'm making things that say, "You majorly suck at this. Probably you should be making sandwiches for people instead of this," all day long.

Making piles of basket hangers all day may not be as intellectually stimulating or challenging as pattern welded candelabras might be, but I've had to be more respectful of my emotional limitations when it comes to accepting abject failures as Valuable Learning Experiences.

A major motivator for me recently has been talking to a manager at a local garden center who said he'd buy such things as basket hangers and trellises from me if I brought them, so I have at least one market besides Etsy to lean on now! Which is great news as I am also celebrating my two-thousandth dollar spent on blacksmithing! Hooray!? Does it count as a business if it spends more money than it makes? Probably. For example, take my bank...PLEASE! *mic drop*

BLB

Saturday, March 14, 2015

Ta da! Ta da! Ta da forever!

I made sort of an ultimatum with myself that I wasn't going to indulge in blorging about side-projects and distractions until I had glowing hot twisted metal to report too. So it gives me great pleasure to cut the official/proverbial red ribbon on SHF (or as I like to pronounce it, "Shuff") with two milestones passed: First "real" forge built and fired, and first sale to a complete stranger. Here's a condensed list of what I've been up to for the past month or two:
  • New floor! - I picked up and moved just about everything out, hacked the floor up with a pickaxe, and (along with the surprise help from one D-Millz) covered the ground with some pavers.
Credit to D-Millz for the photo. If anyone has a Fuji X-Pro1 lying around, I'll buy it from you.
  • Made an anvil stand! - From cinderblocks to Cinderella story, the anvil has come a long way up the social ladder. I traded a favor to a local sawmill in exchange for a beautiful, rough-sawn block of black locust. Add a bunch of scrap metal from Swift & Mcormick, and ta da!


  • Restored a post vice and built a work stand for it! - I picked this vice up for a song on Craigslist, and after a little love and tenderness it has come back to life and helped tremendously with many of these projects. Big thanks to J-Loo for help with the welding and the pipe. Getting this 7/8"x4' thick plate into and out of Greg's truck by myself sure was a fun treat for my body.

  • Bought a stick welder! - For years now, I've been trying to work around the problem of welders being balls expensive by making one. While in principle, this project isn't complicated (at least in terms of moving parts, wiring diagrams, raw materials, etc.) it is extremely dangerous, and I didn't trust myself enough to actually use the damn thing. It wasn't too hard to salvage some transformers, rewire them to my purposes, and hook them together, but without a way to control the welder's output it would have been a really limited tool, and adding a variac would have brought it in line with the cost of buying a new welder (and if you think using home-wound transformers sounds dangerous, then don't even google homemade variacs). Anyway, the point is that suddenly I came across this beast of a beauty and snapped it up.
    This monster weighs more than twice what I do, and sucks up 220/440 volts at 84/42 amps, and J-Loo (my senior welder advisor) tells me it could handle 1/4" rod, which, I mean, I've never even seen welding rod that large for sale, though it's very possible I didn't understand what he was saying (I often don't).

    Also if moving that plate for the vice stand sounded like fun, imagine me trying to get THIS out of the back of an F250. Thank the gods my neighbor, O-F'sho, came along to help me belay it off the barn's overhang. 
  • Made a(nother) forge! - I've gone through about ten or fifteen different forge bodies and about half that in burner designs, and I finally made one that WORKS. I had some really grand plans for sourcing all the material from scratch and making this badass, bronze age looking temple of fire, and I haven't given up on that dream, but I did frankly get sick of not forging and had to throw some real money at the situation. WORTH IT.
    For this edition, I went with a pretty standard ABANA approved Ron Reil design, and though it will eventually plug into a lovely C-shaped pipe forge that I'm still working out how to put a hole in the top of, for now it's shoved right into a hole I drilled into the top of a firebrick.


  • Worked for some actual blacksmiths! - The guys at Orion Forge in town gave me the wonderful opportunity to help them out with some work for this year's Winterfest here in Bend, and besides getting to work with them on some of the larger pieces they were making/bringing to the festival, I got to prep for and lead a bunch of hands-on blacksmithing demos during the whole weekend. We made wall hooks! I'm hoping to continue "interning" with Orion in the future, but we'll see.
Here's the booth where we set up shop - that's me in the grey apron in the back. It started to get really busy once people were drunk. Fun fact - when it comes to how drunk you are, there's an inverse relationship between one's confidence in blacksmithing and the ability to do blacksmithing. Also you will begin to find the phrase "quench the tip" increasingly hilarious and your eyebrow wagging and elbow throwing will reflect this.

I got to cut a lot of the square pipes and plate covers for this guy! Once we finished building it, we took the whole thing over to a powder coating company where they have RV garage sized ovens where we heated it up to 300-400ºF and then painted wax all over it. 

For the coronation ceremony I got to light the propane flames that shoot out the top, which didn't seem to impress the awkward dude they hired to be the Fire King this year too much. Super weird moment.
  • Sold a cocktail sword on Etsy! - Some dude in GA bought the sword I listed on Etsy! I was really surprised because I totally didn't put my heart into the listing and it was kind of a joke/experiment. In fact I originally intended it to just be the first little sword I made in the Nail Forge, but I totally I forgot about that when he asked me how many I have, so I told him I'd make them to order. Then he went and ordered the sharpened and blood-runnelled options I listed, which grossed me $8, but meant I had to go and make a new one. Anyways, I spent a day massaging the process a little more and worked out some manufacturing kinks that were holding me up from making more of them and got one in the mail to him. After hugely miscalculating postage, I netted a little less than $2 out of the sale, but I had fun and it felt good to have a legit customer. Expect to see a lot more stuff showing up on my Etsy page now that I'm starting to understand how it works. Speaking of...
  • Started making more Etsy-able items! - Starting with dice! Also now that I'm practically a master hook maker post-Winterfest, I'm going to be listing a few different hookish things.

One of my first tool projects is making more/better punches so the pips aren't quite so wild. I did these ones with a drill press (crazy generously donated to me by Hunter over at Orion Forge).

A very early hook in my hook-making career. It lacks the spit and polish of many of the later ones, but I like its shape more than most of them.

One of my most recent hooks. I made it for some dude who showed up at Winterfest about ten minutes before the whole festival ended and asked if I'd make a hanging garden basket hook type thing, and though he was exceedingly drunk and wanted to trade me a "yoga" swing in exchange for it, I figured why not? 

He vanished into the night, but the hook does a great job of holding up my 5 gallon bucket-o-tools.
  • Made a solar forge! - This was a quick little side project that ate up a day. I picked up a free 55" projection screen TV and used the enormous fresnel lens on it to make a giant death-ray contraption! I haven't tested it again since early January when I built it (and back then it couldn't really do more than get your hand really uncomfortable and smoke wood since the sun wouldn't get much higher than like 65º), but hopefully by summertime this thing will be up to forging temperatures.
    One thing I do wish I was still in the south for; this guy would melt steel if it were in Georgia. I'll be interested to learn how powerful it will get up here in Oregon.

    Note the strange brick sculpture I made for one of the many forge bodies I tested and rejected. Thankfully this has been replaced by a much more sturdy metal table thanks to my welder.
Anyhow, things are shaping up nicely, and I'd like to think that by the end of next week I'll have figured out some way to attach my new burner to something a little better than a pile of firebricks. For now, here are a few more pictures of where I'm at today.


Before.
After.


Thanks so much to all of you for your support! It's such a relief after half a year of work now to be actually DOING the thing I set out to do a couple years ago, even if it's just little stuff like dice. I can't wait to dig in and start cranking stuff out!

-BLB

Sunday, January 11, 2015

The Long Dark

Lawdy lawdy, it's amazing what a two months of traveling, two feet of snow, and two weeks of being sick can do to hamper your aspirations as a blacksmith; anvils aren't famous for being easy to move, snow isn't a lot of help with getting metal blazing hot, and it's hard to swing a hammer when your bod feels like it's made of candy canes. But, as episode two of The Wire reminds us all, You Cannot Lose If You Do Not Play. So for the past little bit I've been directing my energy into side projects.

I wanted to send my friends and family some handmade (admittedly late) Christmas cards, and my usual modus operandi is to rummage through the recycling bin for papers without too much junk on them, draw some pictures on them, slap the ol' John Doe on there and then wait until the next time I see the person (because postage is expensive y'all). But last year mi padre reminded me of that Douglas Adams quote: "He had been extremely chastened to realize that although he originally came from a world which had cars and computers and ballet and Armagnac, he didn't, by himself, know how any of it worked. He couldn't do it. Left to his own devices he couldn't build a toaster. He could just about make a sandwich and that was it."

A good reminder to us that standing on the shoulders of giants isn't all about enjoying the view - sometimes you gotta get right back down to bedrock. Taking a page (HAH) out of m'grammy's playbook, I decided to start with making paper. Full disclosure, I may have started like 10 meters up from bedrock (and if you know anything about Minecraft, you'll know this is where the most diamonds are found) and skipped trying to gather yard clippings from under the snow. Instead I turned to our mysteriously enormous collection of paper bags.

This is post (HAH) paper making project too.
My suspicion that they may come in handy might have been a self-fulfilling prophecy, nevertheless it was proved correct. The steps in making paper are actually super simple. You make a pulp, you strain the pulp, you dry the pulp.

You don't need paper to make paper (unless it has some very specific combination of numbers, symbols, and dead people printed on it, in which case you need quite a lot of paper to do anything at all, it seems) - you can use grass, leaves, or just about any plant material - but I chose the paper bags because I already had a ton of it inside and because I wanted my paper to be brown. Since my project list was already a few arms long, I needed my coffee inside me, not dyeing paper.

I quickly eviscerated several of the bags with some scissors and left them to soak in a bowl of warm water for a few hours. While they soaked, I checked around all our windows to see which was the smallest one, and then popped the screen off of it. I spent the rest of the soak time trying to find a container big enough for our smallest screen. Unsurprisingly the bathtub was the only suitable vessel.

Knock knock. Who's there? Dwaine. Dwaine who? Dwaine the tub before your landlord finds out you're making paper in his bathtub using his window screens.
I didn't take any other pictures of this because though it worked just fine, it was a little impractical. The next day I went out and got a smaller screen for a couple bucks from the ReStore. Once the paper was good and soaked, I ground it into a pulp with a mortar and pestle. Just kidding, I used an immersion blender because time is money, people. My new screen fit almost exactly into the kitchen sink, so I dumped the pulpy goodness in there with a dash of cold water and corn starch (to keep the ink from running).  Next I swished it around and sloshed the screen in, trying to get as even a distribution of pulp as I could on the screen without getting big bare patches.

Sorry so many of these next ones are blurry. I foolishly assumed that blinding florescent lighting would produce crisp, if hideous, pictures.
If our butts were printer shaped, this is absolutely what our poop would look like.
At this stage, it's got a TON of water in it still, so I gently pressed out as much as I could over the sink with a washcloth before transferring it to a towel on the ground for some heavy petting. It's really easy to accidentally rip a chunk off at this step, so it's kind of time consuming.

Mmmmmmmmm...

Pat pat pat pat pat pat pat pat pat pat pat.
Now it's ready to get off the screen. I chose to liberate the paper straight onto our bathroom floor since we have a heater fan in there already for the booch.


Once it's dry enough to hold together, I hung them up on the clothesline I made for the cyanotypes to dry a bit straighter.


Paper accomplished. This paper went on to be cut up, folded, and glued into envelopes designed to protect the letters inside. Now, the purpose of the letters was to let people know that their Christmas present from me (whether they like it or not) is for me to make them something out of metal. I decided since I have so much equipment for cyanotypes [see here for more on that project] that I should try making the cards that way to save time.

I opted to make post-card style letters with a photo print on one side and the letter on the back, so I started by whipping up some sensitizer and painting it on both sides of some watercolor paper. Once they were hung up to dry with the envelope paper in the darkroom, it was time to hit the Photoshop. I picked photos out for everyone and then overlaid a B&W gradient on them, fiddled with the curves to make them super contrasty, gave them a high pass filter to really make the edges pop, applied a second overlay of salmony orange (which seems to help control the exposure rate a bit better than plain B&W does), and then inverted them to make them negatives. The negatives were printed onto 8.5x11 transparency paper and with that it was time to start sun printing!

Now, a problem I ran into a few months ago when I was last making a lot of sun prints was that it was really hard for me to hold the negatives flat against the paper without moving it at all and still be able to check for exposure. I figured with the number of prints I'd be doing, it was time to buckle down and make a contact printer. For another two bucks at the ReStore I picked up a nasty picture frame, which, Frankensteined together with a creased wood ply panel I had leftover from a computer cabinet held on with some spring steel canvas clips, made a pretty decent printer.

Some negatives next to the printer.
The canvas clips don't add that much pressure, but it's enough that with my hand on the back of the top half of the panel, the prints are firmly held in place. Here you can see the letter and one of the prints I used.
The fold in the center of the panel makes it easy to check on the print and see how it's doing quickly without losing the alignment on the negative.
On the day that I had everything ready to print, I checked the forecast and saw about eight days of cloudy weather ahead of me. Of course I should have waited it out, but then I didn't. The first round of prints I made spent a whopping three minutes per-side out in the "sun" (which is a long time in sun printing), and I'm happy to report that the contact printer worked great, none of the images were blurry at all! Sadly, they were also invisible because three minutes in the shade is as useful for exposing cyanotypes as fly fishing is without any line - a lot of running back and forth waving your arms and standing with your body in unnatural positions, but no dinner.

So back to painting sensitizer in the darkroom. I tried again in a few days when the sun popped out for a couple hours, but this time I learned to make extra sensitized papers so I have room to dial in on the right exposure depending on what the sun is up to (since its strength varies depending on relative humidity, time of day/year, temperature, mood, etc.), and this saved me some labor pains.

I wanted to include a hand written letter too, so I experimentally stenciled a little tree onto some card stock with the leftover sensitizer I had. I didn't expose them, so the cards were green upon mailing, but should turn blue once they're opened - I'm excited to hear if this worked.

I had a lot of leftover botched prints, but they'll come in handy for future projects
Now, I know what you're thinking - you went through all this and you're just going to glue the envelopes shut like a peasant?! That would be so déclassé, no of course not. I decided to make a wax seal because wax seals are so damn classy there should be a class action lawsuit against them.

The first hurdle in making a wax seal is that they're fantastically useless without any wax. Sealing wax is unique among waxes because among its laundry list of qualifications are that it shouldn't evaporate when melted, should dry fast, needs to be hard but not brittle, must stick to paper without being so oily that it is absorbed and looks ugly or stains the letter inside, and can't be so sticky that it gloms onto the seal when it's pressed.

You can buy it at Michael's or online if you're a CHUMP who wants to spend hard-earned cash on WAX which your ears make for FREE. I personally didn't produce enough from my ears to make a substantial contribution to the project in the timeframe I had, so I toyed around with some different candles around the house, but they were all made of disappointment, not sealing wax. I had tried this before in high school, and I remember thinking crayons were practically designed for this, but I found they smoked too much and dried way too brittle. In an act of providence, Bucket had just bought a hot glue gun over the holidays, and I felt that what I want is a wax that is almost like hot glue, so I figured...


They melt around the same temperature, right? The glue actually melts a little slower, but it, amazingly, worked perfectly. Approximately two crayons to half a glue stick over the stove for a couple minutes and poured into a little aluminum foil mold makes a stick of sealing wax you'd pay good money for like a CHUMP.

On to the fun part - Some of y'all may have noticed the logo I whipped up a couple months back when I was gathering internet real estate where which to flog m'blog, and I thought it would make a great seal, so I got to I test carving a few different materials. A handy lump of silly putty (delivered to me in another providential move by my other grammy) worked ideally for testing the seal periodically to see what the positive impression would look like. Once I had a design I liked in wood, I decided that the end of a bolt had the aesthetic I was going for.  My trusty Dremel Stylus once again girded itself for battle, and together we gnawed away at the bolt in half-hour increments until we had a decent approximation of what I was going for. I put a little heat on it with a torch and added some accents with a little star punch I had on hand, cleaned up the center lines with a flathead drill bit, and that was that!


I did a few test seals on some scraps leftover from making the envelopes and then got to packing and sealing letters.


It seals really nicely, but I glued most of them before putting the wax on because I don't trust me or the USPS.

Do a lyric search for I'm Too Sexy by Right Said Fred and then do a find and replace for "sexy" with "Etsy".
I used the ice pack (bottom right) to keep the seal cold between impressions, which keeps the wax from sticking to it and also sort of flash-hardens the wax in place.
Thus they were ready for mailing and the saga of The Letters Wot I Made From Scratch comes to a close.

This might seem like a lot of work not forging, and that's absolutely true. I'm really excited to get back to the forge - in the week I had home between traveling to St. Louis for Thanksgiving and Atlanta for Christmas, I picked up a whole bevy of new tools and resources, chief among them is a beautiful post vice I picked up for a song and a "How'd'y'do", which I'm eager to write about later. For now though, I'll close with a bit of more off-topic news - some of you know that I've been tossing around an idea for a pirate/Master & Commander-themed board game for a few years now, and while I was home for Christmas I experienced another one of those huge surges in enthusiasm for working on it. This time it has made it all the way to prototyping!

Most of the pieces are bits of foam or borrowed from other games for now. Instead of printing and cutting out the hex tiles I drew, I just traced a Catan hex and made 3d hex parts to set on top of the map.
I've been using ProCreate on my iPad to do most of the design work, which has been a lot of fun. 
The ships and islands are made out of a sort of salt dough baked hard in the oven. I got the idea from my Aunt who made tree ornaments from the stuff. My dad ate one thinking it was a cookie - a mistake he will not likely repeat. I patterned the ships using a cookie cutter I made out of strips of soda can.
Bucket and I have been playing around with it for a few days, and I'm excited to say that maybe by the end of the year I'll have it for sale on thegamecrafter.com!

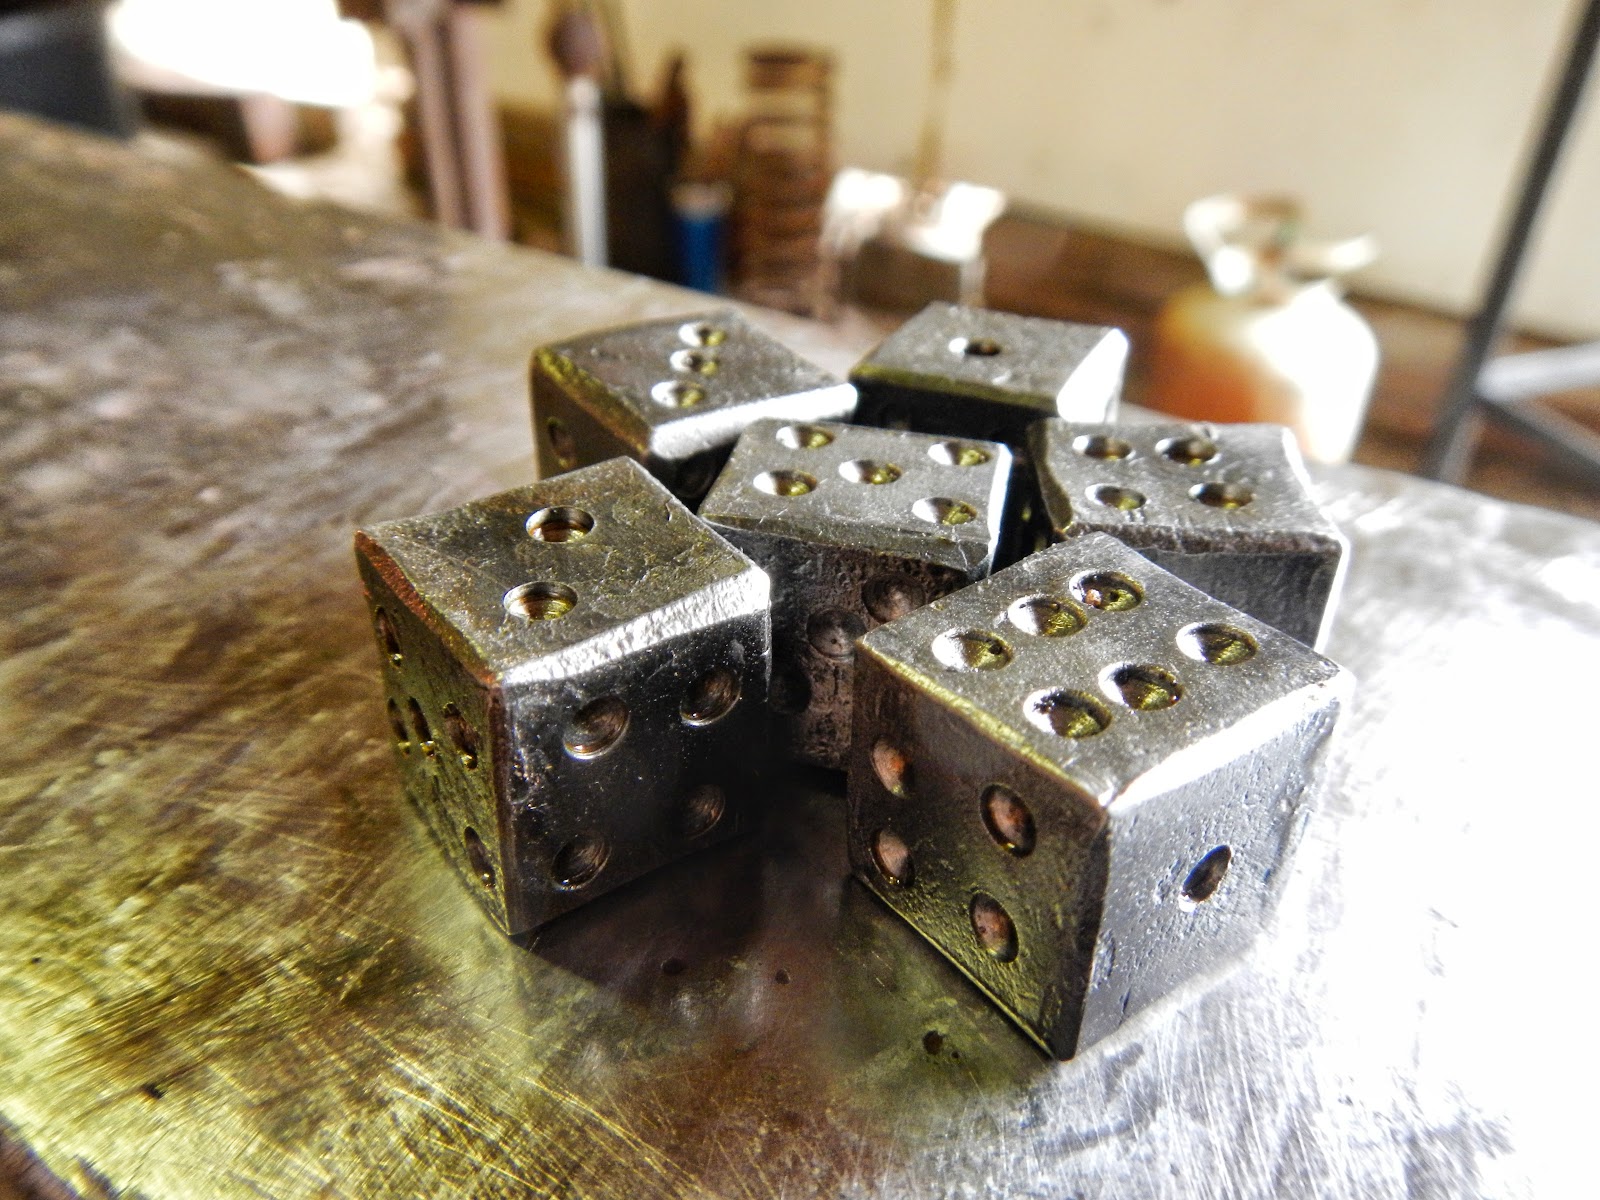
More on the forge soon. Here's a sneak peak.

2015 Sweet Hollow Forge calendars forthcoming.
BLB

Friday, November 21, 2014

Firsts and Futures

Time was, so I'm told, when a body could open up a shop with naught but brow sweat and boot strap exercises and still come out with enough change to pop down to the barber shop for a mustache trim. Times they are a changin', my friends. Yesterday was a day of many firsts, one of which was the forking over of my first thousand bucks of "skin in the game". I feel safe declaring myself officially "in the game".

Of course, $1k is small fish on the grander scale of business investments and I'm sure that those my senior are having many a knowing chuckle and head wag at my childlike innocence, but considering I'm both living off and investing from my savings, scant to begin with and rapidly becoming scanter-er, perhaps I may be forgiven.

However for all my hyperventilating in the Lowes plumbing isle over $2 pipe fittings, yesterday was a day of many auspicious firsts as well. BEHOLD!

 Wait, that's not the right one...

BEHOLD!
Tada! Tada! Tada! Tada forever!
The fruits of Nail Forge 1.0.2, a pair that only a mother could love. Nevertheless at least one of them is not so ugly that it didn't prevent me from canvasing the internet with my new business. The astute and/or slightly creepy of you may have noticed that since yesterday, you can now find me on Etsy, Facebook, for some reason Twitter, as well as, I'm sure your favorite, here. Which brings me to the part where you may have noticed that the forge proper has got a proper forge name now! If you're curious as to why Sweet Hollow Forge rather than a different combination of letters and sounds, it doesn't have a huge story. You may recall that it took a while to get the details in order and paperwork drawn up for the space, but I did get a "contract" eventually. In there, G&J (the owners) agreed to rent me space in "The Hollow". And I was like cool, the barn has a name I guess, but The Hollow is a little forbidding and dirge-like, and initially I was going to go with Fox Hollow (on account of my home turf in Georgia) but I'm not positive there are even foxes around here, and if there are they probably aren't very good blacksmiths. Anyway, Sweet Hollow has a nice kind of faintly southern ring to it, and so do I sometimes*, so there it is.

*I seem to have a southern accent in direct proportion to the southern accented-ness of the people I'm talking to.

But before I get too far ahead, let's get back to that first picture.

The worst meringue.
Pretty wild, huh? So I mixed up some of my freshly cooked water glass...

Almost the exact same consistency as those corn syrup hourglasses. Notice the deformation in the plastic - fun fact: peanut butter jars exhibit fascinating behaviors when you fill them with scalding hot liquids and then panic and dump them out again really fast.
...with ~100ml water and a quart of rough pumice to make a sort of cement. However, lacking aluminum oxide (which apparently nobody in Bend possesses or has heard of - there are a lot of fun "standing in a store being stared at blankly" stories behind that sentence), it thus lacked quite a lot in terms of refractory properties. But heat resistance be damned, I was going to whack flat some nails come hell or high water, so I crammed it in a tomato sauce can with a bit of pipe and a drill bit.

The drill bit was the only 1/2" thing I could find that I could put in the oven. I'm not crazy.
Now water glass cures by simple gas exchange so at that point I had three options to set it up: let it sit and dry for a week, inject it with compressed CO2 or heat the everlovin' jessy out of it. Lacking patience or a Soda Stream, I opted for the oven.

Nail Forge 1.0.1 was a real beauty. I wish I had pictures to show you, but in my enthusiasm to make progress, I forwent documentation. Suffice to say that after an hour of as-close-to-broil-as-possible treatment, the cement cemented. It cemented hard. Too hard. It fused to the center form and burner tube form like something out of The African Queen, and no amount of hammering, cajoling, sweating, or desperate scrabbling was going to persuade it out. At one point I literally tied a rope to the center form, tied the other end of the rope to Big Bgog's trailer hitch, and spent ten minutes yanking on it stubborn-loose-tooth-when-you-were-a-kid-style. Eventually though, I did get it free at the expense of cutting a hole in the bottom of the can and hammering it back and forth until it pulverized 50% of the rock and came out. There was about a 1/4" of cement stuck to the form that I could only get off by flattening the pipe with a hammer. C'est la vie, but at least it wasn't much work to whip up another batch and try again.

Unfortunately, being the disenfranchised, Recession Era, twenty-somethings that we are, Bucket and I only have one tomato sauce can to our names, so I had to repack the same can for Nail Forge 1.0.2 (as I said previously, taking the precaution of greasing up the forms this time around). The unforeseen complication introduced was, to quote Dear Henry, there was a hole in it. A quite alarming amount of that hard-earned water glass percolated out the bottom, oozing and boiling into that fantastic goo you saw earlier.


Undeterred, I cleared Nail Forge 1.0.2 for duty and got to forging.

During operation, the propane torch is lovingly crammed into the side of the forge. 
Soaring new heights for the non-literal use of the phrase "baby steps".
It took a lot longer than I expected to preheat the little sucker (close to 15 minutes), but once it was up to temp, I had fun experimenting with the duplex nails, seeing what kind of swords I could turn them into. I opted to start with the traditional Flat Duplex Nail style, and then moved on to a more conventional Sword An Extra Might Be Given to Hold in a Period Piece style. After that my mind started simmering with ideas of how to do this better (a simmer which, lucky me, boiled over at around 3am today with dreams of katanas, sabers, and epees), but before I could play around too much, I started to get worried about how much the forge was melting and smoking. Though ventilation was good and every measure to make this safe was observed, the forge started degassing some sort of tomato/pumice miasma after about an hour of duty, so I decided to shut things down until the snow clears enough for me to move into... The Hollow†.

† sotto Batman voce

Speaking of which, here's a quick peep tour of the space. I went over on Monday and did a little work clearing it of petrifying horse poop and forklift pallets, and doing my best to level out the ground a bit.

It's hard to tell how much like standing on a 1:1000 scale model of the Himalayas this is, but I promise it was Not Good before I shoveled my little heart out on it.
An arial view of my brilliant dirt layout of the space. Labeling to follow. 
I'm colonizing the right side to start, but theoretically I'm allowed to expand anywhere under the eave... 
...Or, as I said under my breath when I thought G couldn't hear me, "Everything the eave touches...is our kingdom."
Tentative layout labeled for your convenience.
That's it that's all for now. Bucket and I are off to St. Louis for Thanksgiving today, so enjoy your weeklong reprieve from my prolixity.

BLB