They say you can't make a cake without breaking a few eggs, and if that's true then I'm absolutely doing it right. I'm crackin' eggs like the rapture's hot on my tail. There's certainly something to be said for taking the scenic route on your way to a goal. You can learn a lot by asking yourself, "Can I figure out how to make this?" Unfortunately, it's easy to forget what you were doing in the first place while you agonize over a specific component.
Things have been a little up and down the past few days. I've finally successfully produced a batch of (EXTREMELY) concentrated water glass, which was a major confidence boost, and a big step forwards to getting a forge in place. In case you're curious, my efforts to make it from some local silicate didn't work out. At the last COMAG meeting, I talked to a lovely geologist and she told me I should hunt down some diatomite, which is a more rock-like form of diatomaceous earth and similarly composed of trillions of bitty critters of yesteryear. I then left town for a week and then it promptly dumped a foot and a half of snow on all my hopes and dreams. So I conceded to buying some flower drying silica from Michaels just so I could move forward with the project.
I've been throwing a lot of money at some of these miscellaneous projects like that, and it's become a little frustrating. Lots of DIY sites/YouTubers like to brag about how cheap it was for them to throw together something that would have cost them a pretty penny at a box store, but a lot of times they sidestep the cost of not being established and networked. They throw out things like, "I have these 5 lb sacks of silica gel lying around so I used them as..." or "I borrowed my buddy's welder to..." What starts as a $10 forge burner quadruples in price when you realize you don't have the tap you need to thread that one vital piece. It'd be nice if Bend had a tool library like Portland's.
Anyway, now that I have the water glass made up, I've spent about the whole day experimenting with it and the pumice I collected back in the fall. My goal today has been to make a nail forge. My Paw told me about this guy he met who was taking duplex nails and flattening them out into little swords. I thought that'd be a swell reason to make a forge in miniature to test some of the components I've been assembling.
So as I write this, I've got a tomato sauce can full of home-brewed refractory speed-curing in the oven. I made one earlier today which set up beautifully. A little too beautifully in fact - it practically melded to the tube form, and I ended up destroying it just trying to get it out. I took the advice of ye venerable internet and coated the form pieces with vegetable oil this time around, but so far this seems to be having the effect of making the water glass bubble into a sort of glass meringue. Probably I will not eat it.
Lord almighty, if our landlord could see what's going on in here right now, his head would probably explode. Anyhow, we'll see how this all shakes down (or at least I will - I realize that I may be the only one reading this anymore). Fingers crossed. Big money, no whammies.
BLB
Showing posts with label chemistry. Show all posts
Showing posts with label chemistry. Show all posts
Wednesday, November 19, 2014

Monday, September 29, 2014
I Digress
So I have been tinkering around with the geopolymers, without great success so far. I'm attempting to make a couple videos of the process, so I won't talk too much about it except to say if anyone knows any free video editing software, that would be helpful.
I have a couple of ideas of why it hasn't been working out, but I'm having a hard time justifying spending more money on it until I know I've got a place to put the eventual forge. The good news on that front is that Bucket met a nice lady at a get-together who might have some property she'd like to see used for something interesting. We're going out on Wednesday to meet her and her husband and see if we can work something out, I expect I'll write about that and how it went soon enough.
In the mean time, I thought some of you might be interested to see how my other side-project has been coming along! During the summer I taught a class on photography, and one of the projects I did with the kids was Cyanotypes, (sometimes called "Sun Prints"). They're a really basic, entry-level, relatively safe developing style that was used to make architectural blueprints, as they're cheap to prepare, quick to develop, and give you extremely high contrast contact prints.
Anyway, I had a lot of the chemicals and resources I needed leftover after the summer, so I've been messing around with it and seeing how far I can take it. Most of these are just little 4"x5" watercolor paper prints, but I did get some bigger ones in.
All of the first batch were supersaturated with the chemicals because I had accidentally mixed about 50x more sensitizer than I had paper for. As a result, they all turned out a little weird except the two that I left what I thought was a "normal" amount of sensitizer.
I've also been experimenting with toning them so they aren't all that eye-watering cerulean. The lovely folks down at Lone Pine Coffee generously donated some used grounds to my cause, but unfortunately I came away with extremely mixed results. The process involves bleaching the photos with sodium carbonate, and then re-toning the remaining gel layer with a natural tannin. You can use tea, wine, coffee, etc.
As you can see, it didn't go super hot. I toyed around with varying levels of bleaching (from none at all to ultra-mega-super-bleached) and coffee strength/soaking time. Strangely, every single one turned out completely differently, and in ways I wouldn't have expected. In any case, I plan on trying again with some new prints using espresso instead (my guess is that the tannins will be more concentrated and the oils better released this way). I talked to a lady down in the Maker District who paints with coffee and beer, and she suggested letting it dry out/boil down a bit so there's a closer ratio of oil:water. We'll see how it goes!

You can really see the difference between the supersaturated prints and the ones that just had a light brushing of sensitizer (the oval ones). I got some really strange dark splotches on a few of them that look like finger prints, but whether they were made during the initial sensitizing, the exposure, or the fixing, I have no idea.


I used Photoshop to make black and white negatives of a bunch of my photos, and then printed them onto transparency paper. From there it was just a simple 30 to 90 second exposure in direct sunlight to print them out.
So there it is! We'll see what comes of it. Hopefully I can combine the two projects and make some nice frames for the prints out of wrought metal.
BLB
 |
| This is the only 8"x10" print that turned out in the first batch. I plan on doing most of the rest in this size eventually. |
 |
| You can see along the right edge where the sensitizer was laid on so thick that when I fixed it, the sun hadn't penetrated deep enough to expose anything attached to the paper, leaving a big white strip. |
 |
| This was the only one worth sharing of the lot. This was a direct contact print of a handful of grass. |
I used Photoshop to make black and white negatives of a bunch of my photos, and then printed them onto transparency paper. From there it was just a simple 30 to 90 second exposure in direct sunlight to print them out.
 |
| This one got a lovely finger print right in the middle. :/ |
 |
| My favorite one by far. I've done a few prints of this one, but none have turned out as nice as this one. Thanks to Bucket for brushing the sensitizer on this one - I think it made all the difference. |
BLB
Tuesday, September 9, 2014
Shopping Day
Well, today has been both productive and frustrating. I did manage to find a 1 lb. bottle of 100% lye right off the bat, and that will help a lot with the experimentation.

I have some leftover sodium carbonate that I made in the oven for my cyanotype project, and my pH test strips have clocked it at 11 (almost 12 even!), but I'm worried it won't be strong enough. I feel confident that the lye will work even if my homebrewed Na2CO3 doesn't. Four bucks was a little steep for such a small bottle, but worth it for the piece of mind...
Outside of that, I spent a lot of time wandering around different farm supply/hardware stores looking for perlite (without fertilizer, which is apparently impossible), diatomaceous earth, limestone, etc. to little avail. Lowes had this:
I was pretty excited when I found it, but then I checked the ingredients.

I'm not totally sure, but I think this is too many things. Also, I'm no math expert, but those numbers don't seem to add up right. Anyway, I also found this pretty sweet shed at Lowes marked down from either $900 or $2300 depending on which of these you believe.
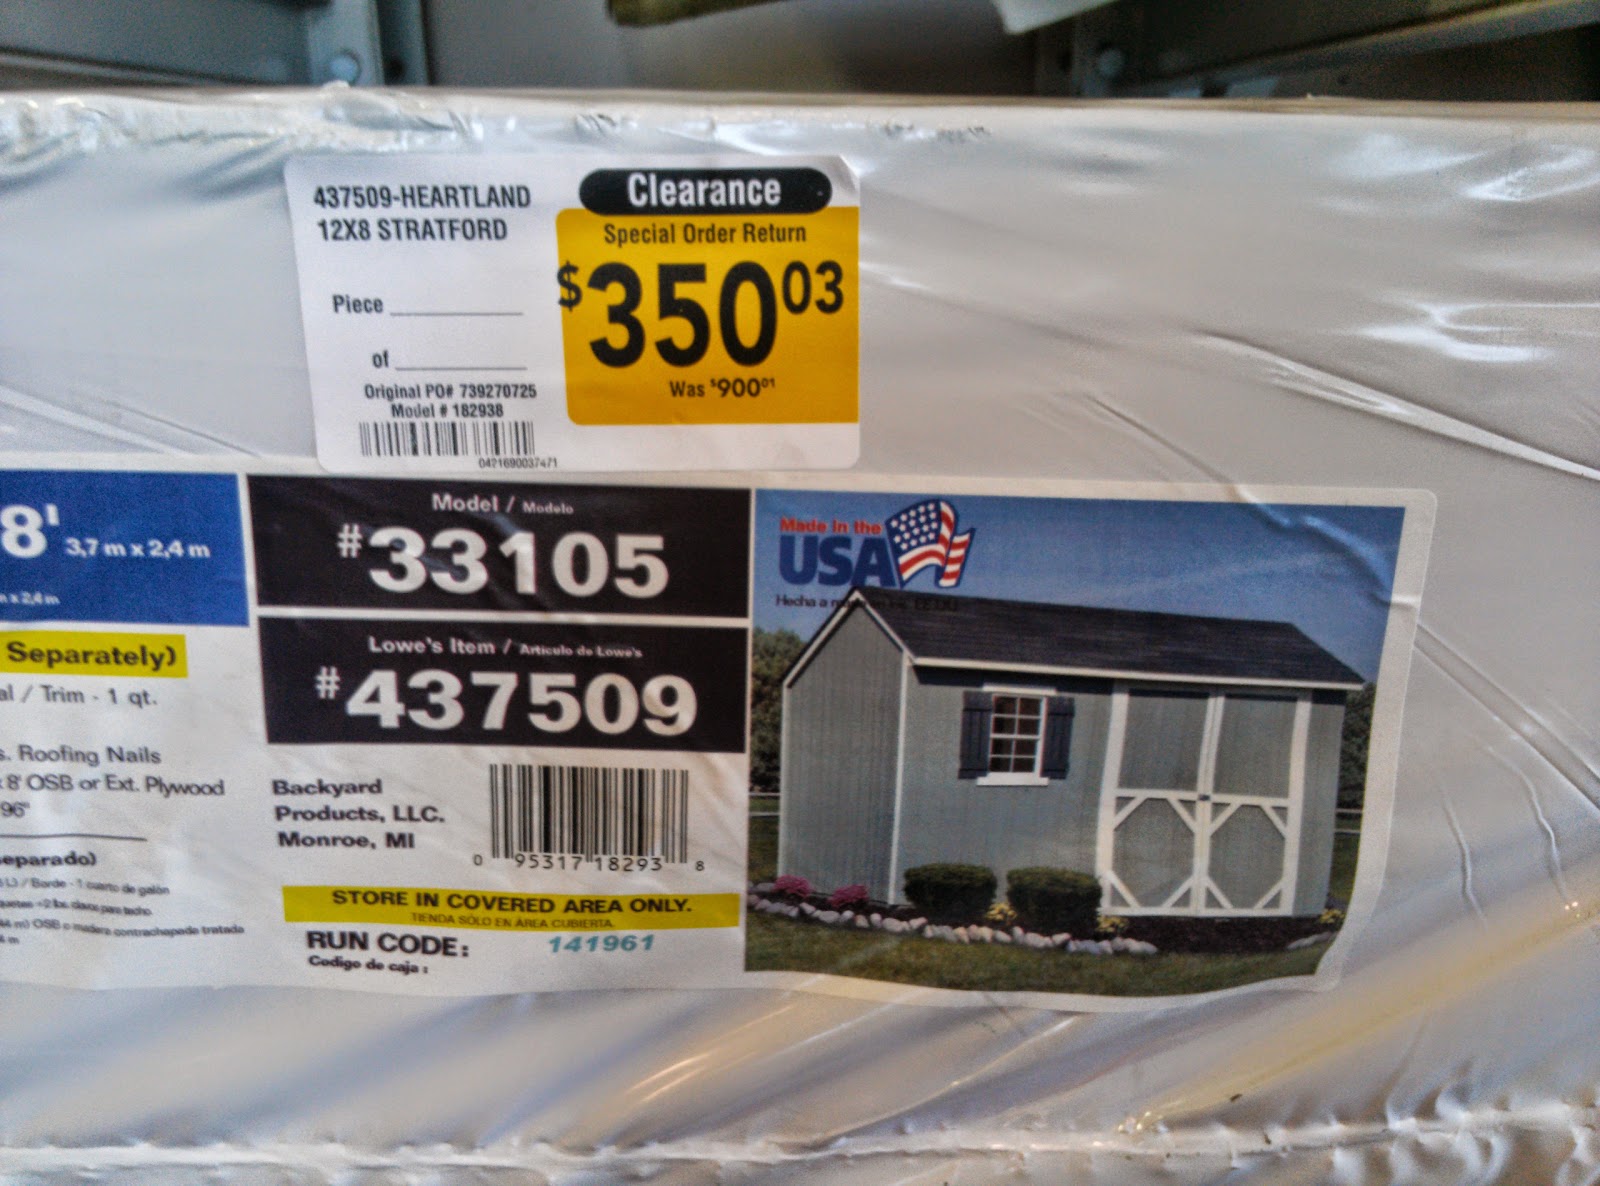
If I had a place to put this, I feel like it would be stupid not to get it, but I guess not having the option has conveniently reduced the complexity of the problem for me!
Here's a quick look at some of the other fun things I picked up today!
That's all for now! A mercifully short update.
BLB
I have some leftover sodium carbonate that I made in the oven for my cyanotype project, and my pH test strips have clocked it at 11 (almost 12 even!), but I'm worried it won't be strong enough. I feel confident that the lye will work even if my homebrewed Na2CO3 doesn't. Four bucks was a little steep for such a small bottle, but worth it for the piece of mind...
Outside of that, I spent a lot of time wandering around different farm supply/hardware stores looking for perlite (without fertilizer, which is apparently impossible), diatomaceous earth, limestone, etc. to little avail. Lowes had this:
 |
| GREAT DEAL, RITE?! |
I'm not totally sure, but I think this is too many things. Also, I'm no math expert, but those numbers don't seem to add up right. Anyway, I also found this pretty sweet shed at Lowes marked down from either $900 or $2300 depending on which of these you believe.
 |
| Wait...so it's...how much for what exactly? |
If I had a place to put this, I feel like it would be stupid not to get it, but I guess not having the option has conveniently reduced the complexity of the problem for me!
Here's a quick look at some of the other fun things I picked up today!
 |
| This blower might end up proving too powerful for the forge, even with a damper flap, but it was only like $10, and will find a way to be useful for something. |
 |
| By a stroke of luck, this package deal saved me a lot of money in brass. |
 |
| No science project is complete without huge PVC gloves. |
 |
| Stainless bowls and tools to get messy with. |
BLB
Saturday, September 6, 2014
The Story So Far...
Now I know many of you will be wondering, "Ben, is the title of this blog meant to imply that you yourself are extremely loud and incredibly hot, or is it blacksmithing that is that?" The short answer is yes.
If your follow up question is, "Are you meaning to say, in an unfortunate dad-humor sort of way that you are hot in a Hugh Jackman sense, or do you mean that you, as a highly exothermic chemical reaction going about his day, are generally uncomfortably warm?" To this I must admit it's a bit of both, but mostly the latter, and here's a thing: both my bod and blacksmithing would, from a sort of...sad...4th grader grasp on chemistry, seem to be exothermic - that is, producing heat as a byproduct of reaction - but while smithing, I am also absorbing a great deal of the forge's heat, which would make me some sort of exo-endo-therm chimera, which seems impossible to my barest of understandings of chemistry, but there it is.
Which is a great example of the kind of fast-and-loose approach to understanding chemistry that I promise to employ throughout this entire project. And so you, dear reader, find me today; struggling mightily to stretch my mind around a subject wildly beyond my ken: Geopolymers. What are geopolymers? For two days now I've been wrestling with this, and here's my best answer: Geopolymers are a mixture of organic or inorganic compounds. An answer as unsatisfying as it is vague and useless, mostly because it seems that a huge variety of materials and compounds fall under this umbrella, and they can be made from all sorts of stuff (which, etymologically, makes sense since the word itself is basically Greek for "a bunch of rocks or whatever"). But let me chop it down to what geopolymer is gonna mean for the practical purpose of my project. Henceforth, I'll call "GP" anything that acts like concrete (aka, liquid stone), but is made up of highly silicate (and possibly aluminate) material.
Why is this important to my project? Moreover, what is my project? Right, I'm building a forge. I could take the easy way out and buy some firestone bricks, or forego the insulation altogether and go with a simple brake-drum style open forge, but I've been there and done that, and I think it would be really fun and useful to know how to make GP, not just for refractory purposes, but as a building material in general (given its emerging popularity as a low-cost, industrial byproduct-eating, earth-friendly alternative to concrete). "But, Ben," I hear you saying, "firebricks are like...$9 each and I can tell already that this is going to be a stupidly deep rabbit hole of a project." Yes. Yes, you're right. However, based on how my previous four jobs have valued my time, $9 is practically a week's worth of 9-5 work, which means I can chase this rabbit pretty far before I'm losing money on time investment.
Here is some light reading on GP's. These are a few of the sources I've been reading through trying to get the gist of it all, sans misc youtube and wiki's, some of which I'll toss in as I go:
http://chiefio.wordpress.com/2014/02/12/some-notes-on-geopolymer-cement-clay-bricks-unfired-and-diy/
http://www.arpnjournals.com/jeas/research_papers/rp_2012/jeas_1112_810.pdf
http://en.wikipedia.org/wiki/Geopolymer
http://www.geopolymer.org/science/introduction
https://www.youtube.com/watch?v=uIRTcmR6sSk&list=UUR4jAT1mvEwRRNo5qv8IewQ
The distilled version of this is, I think, "Pick a glassy mineral, dissolve it in an alkali, add it to some clay or some such, cure it with fire (or not, maybe), voila, GP."
My current understanding is there are two/three components, but I could be wrong here - the mixing phase is still a little mysterious to me at this point.
If your follow up question is, "Are you meaning to say, in an unfortunate dad-humor sort of way that you are hot in a Hugh Jackman sense, or do you mean that you, as a highly exothermic chemical reaction going about his day, are generally uncomfortably warm?" To this I must admit it's a bit of both, but mostly the latter, and here's a thing: both my bod and blacksmithing would, from a sort of...sad...4th grader grasp on chemistry, seem to be exothermic - that is, producing heat as a byproduct of reaction - but while smithing, I am also absorbing a great deal of the forge's heat, which would make me some sort of exo-endo-therm chimera, which seems impossible to my barest of understandings of chemistry, but there it is.
Which is a great example of the kind of fast-and-loose approach to understanding chemistry that I promise to employ throughout this entire project. And so you, dear reader, find me today; struggling mightily to stretch my mind around a subject wildly beyond my ken: Geopolymers. What are geopolymers? For two days now I've been wrestling with this, and here's my best answer: Geopolymers are a mixture of organic or inorganic compounds. An answer as unsatisfying as it is vague and useless, mostly because it seems that a huge variety of materials and compounds fall under this umbrella, and they can be made from all sorts of stuff (which, etymologically, makes sense since the word itself is basically Greek for "a bunch of rocks or whatever"). But let me chop it down to what geopolymer is gonna mean for the practical purpose of my project. Henceforth, I'll call "GP" anything that acts like concrete (aka, liquid stone), but is made up of highly silicate (and possibly aluminate) material.
Why is this important to my project? Moreover, what is my project? Right, I'm building a forge. I could take the easy way out and buy some firestone bricks, or forego the insulation altogether and go with a simple brake-drum style open forge, but I've been there and done that, and I think it would be really fun and useful to know how to make GP, not just for refractory purposes, but as a building material in general (given its emerging popularity as a low-cost, industrial byproduct-eating, earth-friendly alternative to concrete). "But, Ben," I hear you saying, "firebricks are like...$9 each and I can tell already that this is going to be a stupidly deep rabbit hole of a project." Yes. Yes, you're right. However, based on how my previous four jobs have valued my time, $9 is practically a week's worth of 9-5 work, which means I can chase this rabbit pretty far before I'm losing money on time investment.
Here is some light reading on GP's. These are a few of the sources I've been reading through trying to get the gist of it all, sans misc youtube and wiki's, some of which I'll toss in as I go:
http://chiefio.wordpress.com/2014/02/12/some-notes-on-geopolymer-cement-clay-bricks-unfired-and-diy/
http://www.arpnjournals.com/jeas/research_papers/rp_2012/jeas_1112_810.pdf
http://en.wikipedia.org/wiki/Geopolymer
http://www.geopolymer.org/science/introduction
https://www.youtube.com/watch?v=uIRTcmR6sSk&list=UUR4jAT1mvEwRRNo5qv8IewQ
The distilled version of this is, I think, "Pick a glassy mineral, dissolve it in an alkali, add it to some clay or some such, cure it with fire (or not, maybe), voila, GP."

My current understanding is there are two/three components, but I could be wrong here - the mixing phase is still a little mysterious to me at this point.
- An Alkali of at least pH 10, e.g.
- Lye (Sodium Hydroxide [NaOH])
- Lime (Calcuim Oxide [CaO])
- Hydrated Lime Calcium Hydroxide [Ca(OH)2])
- Natron (which, seems to be functionally near enough to washing soda, aka Sodium Carbonate [Na2CO3]
- A Silicate/Aluminosilicate, e.g.
- A Strata? (Like perlite, or one of them clays from #2, or kitty litter)
Now that we have a list of ingredients, let me butcher for you the chemical processes that form a GP. To roughly translate from here a bit, I would describe it thusly:
- Initial Mixing - An alkaline solution is used to dissolve Si and Al ions from the amorphous phases of the feedstock. I take this to mean that anything non-crystalline in structure (aka, your silicate ingredient) gets dissolved by the alkali.
- Condensation - In the resulting solution, the Si and Al hydroxide molecules condense with adjacent hydroxyl ions, forming oxygen bonds (and water). I think that at this stage you have a monomer solution of silica and aluminum in water, just waiting to polymerize.
- Poly-condensation (aka Polymerization) - an application of heat (apparently anywhere from ambient temperature to no more than 90ºC) causes the monomers and any leftover Si and Al hydroxide to polymerize into rigid chains/nets of oxygen bonded tetrahedra. I believe this is a science-y way of saying, "Then you dry it out and it gets hard."
Now here's where my ignorance of both chemistry and cement mixing really begin shine. I'm left with the following questions:
- Is waterglass essentially a solution of "monomer-ized" Si/Al hydroxide waiting to be catalyzed into GP? I'm guessing that waterglass has no Al in it, and that for this purpose you would ideally want as pure a solution of dissolved SiO2 as you could get before adding it to an amorphous aluminosilicate strata for to make it into bricks and whatnot. I really have a very bad grasp on what I'm talking about here...
- In terms of choosing a silicate material to dissolve in your alkali, the best example I've seen is in that youtube clip, where he used silica gel and added it to perlite, and perlite is essentially corn-puffed obsidian by composition at least. Well I live in Bend, OR and there are literally big-ol' heaps o' obsidian lying about. Could I dissolve obsidian in an alkali to make waterglass, or would the magnesium and iron in it mess it up? It would be awesome to have obsidian waterglass.
- I have learned that Portland cement is basically a calcium silicate, Al/Fe blend that sets when mixed with water by way of "a complex series of chemical reactions still only partly understood." I can remember partaking of cement mixing in the past and I feel like I remember it involving mixing the cement powder with equal parts sand and gravel/stone, and then adding water to a desirable consistency. With GP's it seems waterglass is kind of an equivalent Portland cement, which you would then add to whatever you want bound. I wonder how far off base this understanding of the process is?
- Given that GP's are practically entirely glass and aluminum, I'd assume they are by default pretty damn fireproof, but I don't trust my grasp of the situation enough to rule out that there may need to be modifications/additions to the recipe to make this material useful for me as a forge liner. If so, I wonder what they are?
So there it is. I've got a long way to go, but I feel like I'm on the right track. All this geopolymer nonsense aside though, I don't have a really satisfactory big-picture plan for how this operation will come together. Since I'm renting a duplex in a pretty cramped little cul-de-sac, I have neither an indoor nor an outdoor work space that I can call my own. I've been drawing up some crude plans for a blacksmithing trailer, and have been keeping an eye on the trailer market on Craigslist for a few weeks now, but so far nothing is leaping out at me. M'lady, Bucket, and I have been eyeballing the house market too, which is the long-game, low-fun solution to this problem, but I'm ready to smith NOW. I'm keen on the trailer idea owing to both my nomadic tendencies as well as a desire to make it possible to bring smithing to the community in the form of Blacksmithing Camp. Since Bucket is big-lady-on-campus with a camp organization here in Bend, she's designing all sorts of programs for all times of year, and I feel like I'd be a shoe-in for some of those. So yeah, Blacksmithing Trailer (aka OPERATION "ROLLING THUNDER") is a subject for another time.
Thanks for your interest! If you know anything about this stuff or, through reading have discovered that I've totally got it all backwards and upside-down, please, PLEASE let me know in the comments or jot me an email or something. You guys are the best.
Big Love, Ben
Subscribe to:
Posts (Atom)